On this page:
Camera/Light Cable Slack
Camera Tilt Belt Tension
Set Reverse Camera Position
Clicksteer Setting
Rotate/Linear Speed Settings
Dock Target Calibration
Gyro Calibration
You need to have the server application running with the remote control browser web page open on a nearby PC, to do the following calibration steps.
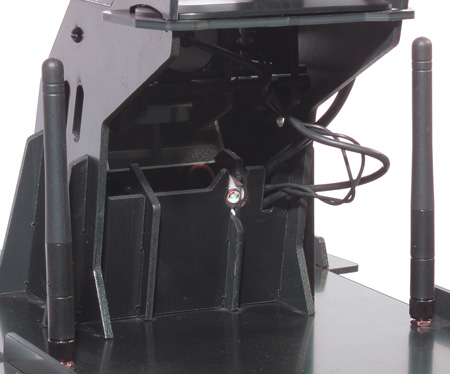
Step 1 – Camera/Light Cable Slack
Route the cables for the camera and light into the lower slot, with the approximate amount of slack as shown below. (NOTE: you might have to open the rear panel and carefully dig within to pull the cables through into the motherboard area, to get the right amount of slack).
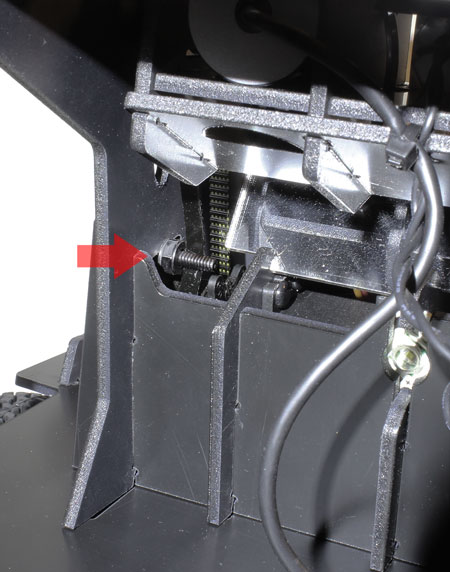
Step 2 – Camera Tilt Belt Tension
In the remote control browser web page, set the camera servo position to horizontal, by clicking the ‘camera horizontal’ icon. Then, with the belt tension screw backed off, manually move the camera into an approximately horizontal position.
Slide the tension screw forward in it’s slot so that the camera assembly is fairly difficult to tilt manually without skipping the belt. (But not so tight that the pivot is noticeably flexing):
Step 3 – Set Reverse Camera Position
Go to ‘menu > settings/calibration > motor settings’. Enter test values in the ‘test tilt position’ box and press ‘go’ until you see a reverse view framed similarly as shown below. Type the final value in the ‘camera tilt reverse position’ box and click ‘send values’.
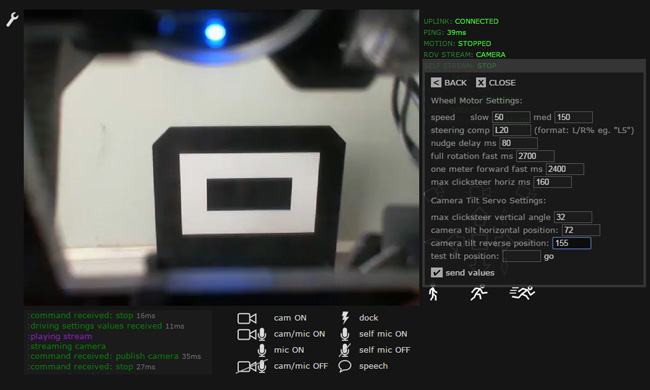
Test the full range of camera motion by using the up/down camera controls and clicking ‘dock > manual dock > reverse camera’. You might have to tweak your belt tension again and set your horizontal position a bit lower, so that the belt doesn’t skip on the uppermost tilt position.
NOTE: The camera and light cables shouldn’t occlude the reverse view much more than that shown in the image above. If they do, try flexing them out of the way and tweaking the amount of slack.
Step 4 – ‘Clicksteer’ Setting
‘Clicksteer’ refers to the movement generated by the robot when you move the crosshairs to some position within the video window and click – the wheels should move and the camera should tilt so that the location you clicked becomes the center of the image. Horizontal clicksteer has to be pretty accurate for auto-docking to work reliably.
To set it, go to ‘menu > settings/calibration > motor settings’ and modify the ‘max clicksteer horiz ms’ value (this is the time it takes for horizontal rotation to move the view from the left or right edge of the viewport to the center). Similarly, change the ‘max clicksteer vertical angle’ value to dial-in the vertical tilt.
Step 5 – Rotate/Linear Speed Settings
Under the same motor calibration dialog (‘menu > settings/calibration > motor settings’) you’ll see the values ‘full rotation fast ms’ and ‘one meter forward fast ms’. Autodocking uses the rotation value to accurately do a 180 degree turn and proceed docking backwards, and ROS navigation requires that both rotation and linear speed settings are fairly accurate.
Test the ‘full rotation fast ms’ value by going to ‘menu > advanced menu > telnet text command’ (or press ‘C’) and enter the command ‘left 360’ or ‘right 360’, and eyeball the full-rotation accuracy.
Test the ‘one meter forward fast ms’ value by entering the command ‘forward 1’ and measuring distance traveled with a tape measure.
NOTE: Accuracy of these settings will vary slightly with battery status and other factors, so don’t kill yourself trying to get them perfect.
Step 6 – Dock Target Calibration
Position the Robot lined up square and center with the charging dock, with about a 2" [50mm] gap between them:

Using the web browser remote control, turn on the camera, then go to ‘MENU > settings/calibration > calibrate auto-dock’. Then click ‘reverse camera’.
You should be looking at something like this:
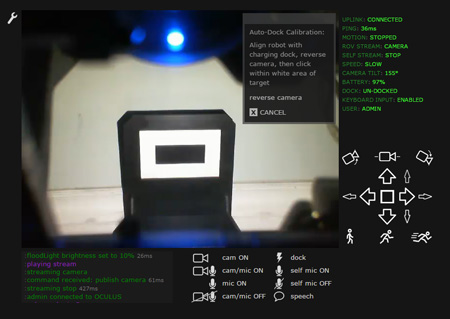
Click within the white area of the target, and you should be good to go.
Step 7 – Gyro Calibration
After the dock target is calibrated, it can be used to visually calibrate the gyrocomp setting for accurate rotational odometry. From the web browser remote control, turn on the camera with video setting ‘high’, and position the robot approximately 1m in front of the dock. Then press the ‘C’ key to bring up the telnet text command prompt and enter 'calibraterotation'. The robot will do 1-2 full rotations, and when complete, it will indicate calibration results in the message window.
NEXT: Mobile Apps