BATTERY HEALTH AND SAFETY
Important things to remember:
- High current LiPo batteries can cause FIRE if damaged
- When not using the system for more than a few days, always unplug the battery
- When using the system, keep the battery topped up
- When the battery is plugged in, always have the Autocrawler Java Server Application running
- Periodically inspect the battery
For more information on battery safety with Xaxxxon robots, see here.
BATTERY SPECIFICATIONS
The AUTOCRAWLER robot ships with the Xaxxon POWERv2 PCB battery charging and system power management board installed, and is compatible with battery packs with the following specifications:
- 3S (11.3V nominal) lithium polymer
- 4-pin female JST balance connector
- XT60 main power leads
- 15C or higher discharge rate
- Maximum pack dimensions: 37mm thickness, 58mm width, 150mm length
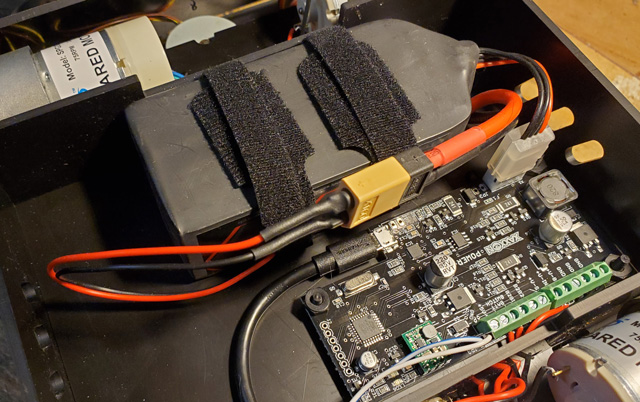
INSTALLATION
If installing a new battery pack, follow the steps below
- Remove bottom panel
- Secure pack with 2 velcro straps provided
- Connect JST 4-wire balance lead to PCB
- Connect main leads to XT60 plug
RESET FIRMWARE SETTINGS (Optional/Recommended)
It’s recommended to modify the Xaxxon POWERv2 PCB firmware settings to match particular battery packs. This can be done thru the web-browser remote interface:
MENU > advanced> telnet text command
To clear any previous settings or errors and reset to default settings, erase all the EEPROM variables with
powercommand 8
To set cell float voltage (other than default 4.15V), the firmware command is capital ‘S’ followed by centivolts in the range 380-415. Eg., to set float to 4.1V, enter
powercommand S 410
To set pack capacity, the firmware command is the number ‘5’ followed by the number of mAh. It’s better to use about 85% of claimed capacity for somewhat improved accuracy. Default setting is 4250. Eg., to set capacity for a pack labelled with 4000 mAh capacity, enter:
powercommand 5 3400
For more information on firmware commands and the Xaxxon POWERv2 PCB, see here.