← back to Xaxxon documentation
In this section:
Software Setup
Running the Sensor
Changing Settings
Parameters
Customizing Default Parameters
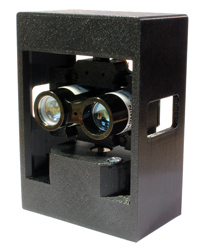
For complete sensor specifications and further info see the
Xaxxon OpenLIDAR product page
For the OpenLIDAR PCB setup and wiring, drivers, serial commands and output, see:
Xaxxon OpenLIDAR PCB docs
For the OpenLIDAR PCB datasheet, download:
xaxxon_openlidar_pcb_v0_datasheet.pdf
Software Setup
Full drivers and support are currently limited to systems running Linux OS with the Robot Operating System. (But, adding functionality with other systems is straight forward, in almost all programming languages, thanks to the firmware’s simple communication protocol).
The drivers are compatible with all newer ROS1.0 versions including Indigo, Kinetic and Melodic. For ROS install instructions, see here.
Install git if you don’t have it already:
$ sudo apt-get install git
Create a ROS Workspace in your home folder by entering:
$ mkdir -p ~/catkin_ws/src
$ cd ~/catkin_ws/src
$ catkin_init_workspace
Change to the ‘src’ directory within your ROS Workspace, and clone the xaxxon_openlidar package from github:
$ cd ~/catkin_ws/src
$ git clone https://github.com/xaxxontech/xaxxon_openlidar.git
Change to workspace root and build all the packages using catkin_make:
$ cd ~/catkin_ws/
$ catkin_make
Now add the new workspace to the default ROS environment by doing:
$ echo "source $HOME/catkin_ws/devel/setup.bash" >> ~/.bashrc
$ source ~/.bashrc
USB ports are only available to root by default in Ubuntu. To give yourself access as a regular user, enter:
$ sudo adduser username dialout
Substitute “username” with your user name. NOTE: reboot or logout is usually required for this to take effect. Now the sensor should be ready to run.
Running the Sensor
Plug in the sensor’s USB cable if it isn’t already, then enter:
$ roslaunch xaxxon_openlidar xaxxon_openlidar.launch &
This should launch a roscore instance, connect to the sensor, start the motor spinning, and begin broadcasting data on the /scan topic.
Now, run the RViz visualization app, preconfigured for viewing OpenLIDAR data, with:
$ roscd xaxxon_openlidar
$ ./rvizlidar &
This should bring up RViz with a view of the scan output, something like this:

Changing Settings
To view and change settings in real time while the sensor is running, enter:
$ rosrun rqt_reconfigure rqt_reconfigure
You should see the rqt_reconfigure dynamic parameter GUI tool, something like:
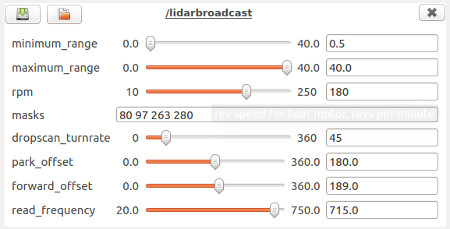
Move the sliders or enter values and see changes happen to the scan immediately.
Parameters
Parameters, their defaults, ranges, and descriptions are set by the XaxxonOpenLidar.cfg file.
Current dynamically configurable parameters are:
minimum_range, meters
maximum_range, meters
rpm, revolutions per minute
masks, string frame masks
dropscan_turnrate, degrees per second
park_offset, degrees past photo sensor
forward_offset, degrees past photo sensor
read_frequency, readings per second
Info for (non-self-explanatory) parameters:
masks
The masks parameter defines the areas of the scan to be blanked. In the case of the Xaxxon OpenLIDAR Sensor, the defaults correspond to areas of the scan that are occluded by the plastic sensor frame. It’s important to mask these areas because ranges read near the edges of very close occluding objects will yield false/inaccurate data.
The parameter is represented by a string of numbers separated by spaces. The numbers should be ordered in pairs, with each pair representing start/stop of masking required, in degrees, arranged in order clockwise (right hand rule) starting from 0/x-axis forward.
dropscan_turnrate
If you have the scanner mounted to a mobile base that does a lot of turning in-place (eg., like Oculus Prime robots), and it turns at a fast rate that is a fairly high fraction of the turning speed of the OpenLIDAR sesor, some ROS packages may interpret the scans as distorted and yield unpredictable results, especially when making maps.
That’s where this parameter comes in: the lidarbroadcast.py node listens to the /odom topic and will blank all scans that are produced if the robot’s turn rate around the z-axis (YAW) exceeds the threshold defined by this parameter, in degrees per second.
We’ve found through experimentation that, while making maps using the Gmapping algorithm, this parameter should be lower (<=45 degrees per second) in order to produce better maps.
NOTE: The Cartographer SLAM and ROS Navigation’s move_base algorithms both use odometry information and automatically un-warp the scans, so use of this parameter with these packages is not required (ie., leave it at default zero).
park_offset
When the motor stops turning, this defines exactly where the range sensor will come to rest, measured in degrees past the revolution photo sensor.
forward_offset
This parameter defines at what angle the unit will output once-per-revolution scan information (ie., reading count and time since last output – see Binary Output Format for more info); it also performs a brief range-sensor calibration operation. This offset is also measured in degrees past the revolution photo sensor.
The ROS xaxxon_openlidar lidarbroadcast node interprets this offset point as the scan’s zero degrees start point, corresponding to the forward X axis of the scan.
Customizing Default Parameters
Rather than modifying the XaxxonOpenLidar.cfg file’s default values and re-building the repo, the preferred method to define custom settings for the sensor is in within your launch file’s XML. Here’s and example launch file entry:
<node pkg="xaxxon_openlidar" type="lidarbroadcast.py"
   name="lidarbroadcast" required="true" output="screen">
  <param name="masks" value="54 80  162 174  190 208  279 305"/>
  <param name="dropscan_turnrate" value="45"/>
</node>