Create a Patrol Route
Once you have navigation waypoints created, you can use them to define a fully autonomous patrol route. Get started by connecting to Oculus Prime via the remote browser interface and going to:
'MENU > Navigation > routes > create new'
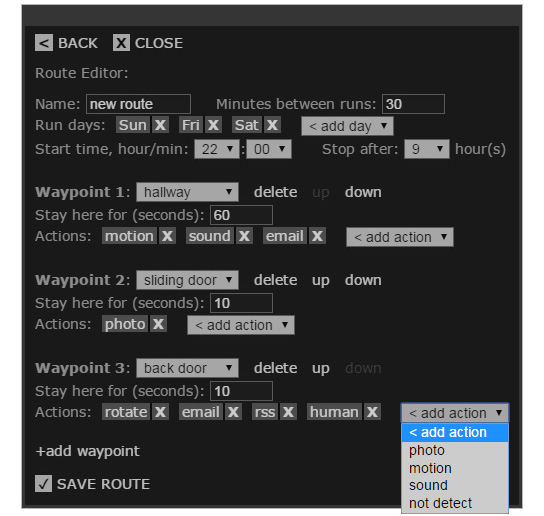
The Route Editor

Set Schedule
Give the route a unique name, set the amount of minutes for Oculus Prime to be docked between individual runs, choose the days of the week for the route to run, followed by the start time, and the total duration to be running routes per day. (Some experimentation may be required with the 'Minutes between runs’ setting to make sure the battery doesn’t run low over time).
Choose Waypoints
Click '+add waypoint' to choose which waypoints you want to be included in the route, and set the minimum number of seconds to stay there (can be zero).
NOTE: if you select 'dock' as waypoint, immediately upon driving to it Oculus Prime will shut down navigation and proceed to charge, effectively ending the route prematurely. The best practice is to not include 'dock' as a waypoint at all, since Oculus Prime will automatically proceed to dock after the last waypoint defined in a route.
Choose Waypoint Actions
Waypoint actions are optional (without any actions, Oculus Prime will simply drive to a given waypoint, sit for the defined 'Stay here for (seconds)', then continue on its way).
Current possible waypoint actions are:
Motion

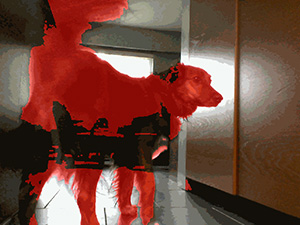
This will cause Oculus Prime to turn on the camera and wait for the specified period of time while checking for movement. If any motion is detected the offending frame will be saved with the areas in motion highlighted, and Oculus Prime will immediately move on to the next waypoint. If there is a low light situation detected, the spotlight will be turned on.
The motion threshold can be changed by manually modifying the motionthreshold setting in the Oculus Prime configuration file. You can test it with the motiondetect command.
You can also try the motion detect live demo by turning on the camera, and going to:
'MENU > advanced > motion detect demo > on'
(Note that the aforementioned configuration file setting doesn’t affect the demo).
Sound
This will cause Oculus Prime to turn on the microphone and wait for the specified period of time while checking for loud noise. Any detection will cause Oculus Prime to immediately move on to the next waypoint. The loudness threshold can be changed by manually modifying the soundthreshold setting in the Oculus Prime configuration file.
You can test the sound detection function with the setstreamactivitythreshold command
Human

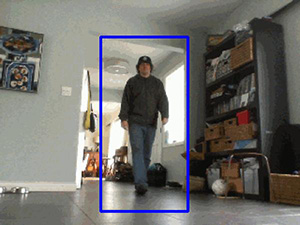
This will cause Oculus Prime to turn on the camera and wait for the specified period of time while checking for humans. If any human is detected the offending frame will be saved with the human highlighted, and Oculus Prime will immediately move on to the next waypoint. If there is a low light situation detected, the spotlight will be turned on.
NOTE: this function tends to have quite a few false-positives and may be best used in non-cluttered environments.
You can test the human detection function by turning on the camera, and going to:
'MENU > advanced > human detect demo > on'
Rotate
This will cause Oculus Prime to do at least one full rotation in 45 degree increments, pausing a minimum 10 seconds at each angle (this will override minimum waypoint duration if it isn’t long enough for the whole rotation). Detection is stopped and started between angle moves as necessary
Photo
This will cause Oculus Prime to switch to the full camera resolution of 1280 × 720 and take a photo. If there is a low light situation detected, the spotlight will be turned on first.
Record Video
This will cause Oculus Prime to record video and audio for as long as it remains at the waypoint. Video is saved to the local drive, with a download link posted to the navigation log
Email
This will cause Oculus Prime to send an email upon detection of anything, and/or email a link to a photo. The email recipient used is defined by the default email_to_address setting (see Alert Messaging Setup – Enable Email)
RSS
This will cause Oculus Prime to post a new RSS item upon detection of anything, including a link to a photo if applicable. For more info on the RSS feed see Alert Messaging Setup – Using RSS and IFTTT
NOT Detect
This will cause Oculus Prime to send an alert if any detection action (motion, sound, human) is NOT detected within the time duration
Conflicting Actions
The system doesn’t support certain actions coupled with each other (eg., motion with human, rotate with photo). If conflicting actions are chosen, they are dropped while you’re editing the route waypoint, with any deletions indicated in orange in the command log window.
Navigation Log
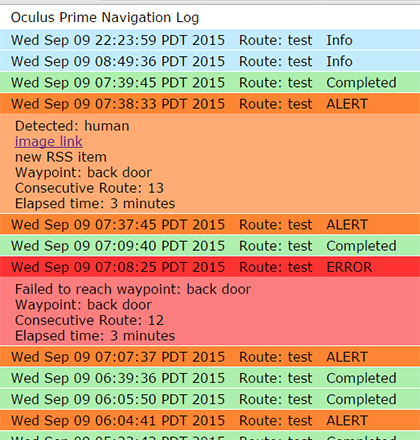
Relevant details of patrol route history, and links to any images and videos, are recorded on the navigation log web page. For example:

To view the navigation log, go to:
'MENU > navigation > navigation log'
Click any particular line item to expand it for more details.
Starting, Stopping, Editing Routes
To activate a route, go to:
'MENU > navigation > routes' then click 'activate' next to the route in the list that you want to activate. You should see the green 'ACTIVE' status flag pop up next to it on the list.
You can also use the runroute command to activate a route
To cancel a route, go to:
'MENU > navigation > routes' then click 'de-activate' next to the active route in the list.
You can also send the move stop command (or press space bar, click the stop button, or press 'S') to cancel a route.
The cancelroute command will also cancel any running route.
To edit a route, go to:
'MENU > navigation > routes' then click 'edit' next to the route in the list. If you’re editing an active route, it must be cancelled then started again for any changes to take effect.
Routes XML File
Route definitions are saved as XML data in the file 'navigationroutes.xml' under 'oculusPrime/conf/'
Patrol Routes Auto-Reboot
The system will reboot after running 15 consecutive routes (we’ve found this increases overall reliability). Reboot only happens after Oculus Prime has completed a route and is docked. Routes will automatically resume on startup
